Monday, December 30, 2013

How to hide the bathroom door

In a home environment, relatively small , recover space is of vital importance . For this reason, in the process of furnishing is necessary to study a number of solutions indicated precisely this purpose . Or in the case where the space is not a problem , however, solutions to make it look like a still larger. Many solutions may be available to us, in this guide we will see how to hide the bathroom door recovering space, but at the same time furnishing.


Hide a door, nowadays it is not a problem , just give space to the imagination, and the solution comes totally unexpected. Let's start to see how to hide it in case we wanted to conceal the continuity of the house giving the illusion that the apartment is still in the room next to the bathroom .To create this effect we would need to achieve a kind of library in which should be applied a hidden mechanism able to open like a door. The library in question will inevitably be chosen based on the furnishing of the room in which it is placed. If our furniture is classic library will also be classic, but if the room is modern, consequently, the library will follow this line.For the inside , the one from the bathroom, we could choose to leave it smooth, or apply some ornament or decoration.

If we are lovers of the simple things , then in this case we may opt to hide our door behind a simple curtain. Of course, the fabric must be matching with the decor and also draw the curtains a little present at the windows of the room so as not to clash, and then deviate too much from furniture. As a type of fabric instead must be large enough to fall in an appropriate manner and cover with sobriety port that is hidden behind it. The fabrics most suitable for this purpose may be quite heavy velvet or linen.

Instead we see a solution to mask both the bathroom door which to recover space. This solution is particularly suitable when our apartment was not big and spacious. To realize this idea will be enough to get a carpenter to build a false door, in wood, very rough, which will be mounted on a sliding mechanism to view. To keep the rustic, simply spend more coats of varnish on the wood, so as to give luster to the door , but also enhance the beauty of the wood with which it was made.

Thursday, December 26, 2013

Shower Column Reviews

When we install a shower especially in the garden, you have to build it in the column.This assembly includes the construction of a slender paralleled on which is fixed a shower head and taps to mix the water. They must be connected to the structure of the pipes that draw water from the main source donor . Let us see in detail how to install a shower column .

In the market you can find shower columns have been processed or finished with tiles, or just metal to be coated with any material. If you opt for the solution of DIY, we can also make the column directly in masonry and then cover it to our taste and maybe relevant to the whole furniture of the garden.


For the construction of the shower column , which must be at least 190 cm high, we provide the concrete blocks that superimposing them on one another in the stack, glue them with a mixture of mortar and concrete. Once you reach the desired height we take care of practice on the upper part of the column shower hole for attaching the head, and in the lower holes for the two knobs respectively hot and cold water. At this point, with the canes copper on the back of the column, we link together the various holes and make them converge in a pvc pipe about 4 inches in diameter, which leads directly to the source. These can be hidden in the ground or distributed along the perimeter of a wall in the lower part . Once the hydraulic part we just have to go to the finish. First, we take care to install the knobs at the bottom to about 1 meter from the ground, and the head that is attached directly to the column.

If you need to install a shower column in a bathroom inside the house, you can choose between different models and design and having already funnels for various water pipes, the shower column should be applied directly on the tiles with the file to four sides. At this point, you can complete the installation with the assembly of knobs and water supply, and the head of the rod that supports it.

Saturday, December 7, 2013

How to refurbish furniture

When you have furniture in the house of a certain value, we should treat them in a certain way to make sure that these pieces of furniture can always be in excellent condition, and maintain as long as possible their beauty, their beauty and their value. As we know how to refurbish furniture, in fact, valuable furniture pieces, usually in old style (if not old) have a great value, and the same rule also applies to those of wood of a certain level. In this guide we will cover how to care for the high-quality furniture at its best.

The first rule to follow which will allow us to keep the furniture of a certain value and shining at the top of their beauty, is to place them in the right place. If for example the fine furniture and wood, you should try to place it in a corner or in a room not particularly moist and subject to particular changes in temperature. The humidity, as we know, is one of the worst enemies of wood, and the same rule applies to the furniture of the same material. Even if they are treated with special products, in the long run may skew ruinous that threaten its beauty.


Also with regard to the location in the house, avoid that they are positioned in a place where the sun's rays arrive direct on mobile. In the long run the sun wears out the natural color of the cabinet off and making it opaque. Alternatively, during exposure to the sun should keep open the curtains so as to cushion the effect of the sun. To keep the cabinet always perfect, cleanliness is important. Every day you have to clean the furniture from dust with a feather duster. Periodically, however, you must provide the following.

Take a wool cloth is very soft and impregnate with straw oil. Pass the oil over the entire surface so as to revive the natural color and shine of the mobile. Need to do this operation over the entire surface of the cabinet. This must be done at least a couple of times a year. Also, do not use detergents, detergents, sprays that are not suitable for the type of material it is made mobile. You can use the wax and oil but avoid any type of cleaning agent that can dull the color of the furniture forever. Never use scouring pads that are not absolutely fluffy and soft otherwise you risk scratching the surface .


Sunday, October 6, 2013

How to decorate a child's bed

As children grow, they need a decor that is appropriate for their age and then to their needs.Well, if your family budget does not allow you to buy a new bed , you can, with a bit of imagination and creativity , adjust the bed for their children according to their age without having to spend a fortune. Here, then, are some tips on how to decorate a child's bed .

If the mattress is not in good condition or if the file size is more age-appropriate, purchase a new one and above all quality. Regarding the table, take a simple stool of unused timber, strip him of old paint, cut the four feet and paint it with a color that reflects the tone of the room furnishings.You can also paste stickers or possibly make some stencils. For the back of the bed , instead, may be used for wood siding. To make these coatings, we must first of all take the exact measurements of the width of the bed, then attach two studs at the ends of the network to be able to screw in the back. It is also possible to also use the old staves of wood, uniting them together and valedictorian.


If you then want to create a canopy craft, you can use fabrics for curtains or simply the sheets. Make a rectangle with the fabric and sew it, install at least six eyelets to tie the fabric to the baccarat . You can also add a phrase such as "sweet dreams" fabric felt.

If you want, you can serve the technique of decoupage in the personalization of the child's bed . From the moment you take several printed sheets , you should use pre-printed paper napkins instead of using glue to stick the designs on each sheet.  The paper towel is usually composed of three layers (two white, one printed), delete the white ones and just keep the printed .

Choose a good reason. The decoupage is practiced on any material: wood, metal, plastic, PVC, etc.. This is a good technique to give life to a bed. Use a colored thread to embroider letters or numbers, or, to make it more fun, you can use the custom stickers , remembering always to combine the right colors.


Friday, August 23, 2013

How to lay the concrete bricks

If in a house we must make a brick building, whether it be of a partition wall , a wall or a fence of flowerbeds, we can do so in a simple, economical and the process is the same for all types of buildings. Let us see in this guide as laying the concrete bricks .

First, we are concerned to take the necessary measures in order to purchase concrete bricks in the right quantity. With them we also need specific material for the construction industry including cement and mortar, and of course some basic tools such as a trowel, a putty knife, a water level drop and a container for the mixture of adhesives and grout cement.


Now, to begin the work of laying of concrete bricks must be paid from the bag of cement mortar and the dose needed to create the dough for the base of the bricks, while avoiding the excess since the processing time of the laying of the latter could be long, and then the mixture may dry too. At this point, leans against a first row of bricks of the required width, liveliness perfectly the exact position, using the wooden pegs and obviously the level. After finding that everything is perfectly level, rise one by one the bricks and concrete are fixed to the ground with the mixture of mortar and concrete. With the same procedure, the salt thus upward, using from time to time mortar and cement, and the level to check the exact position.

It therefore realizes the base with the laying of the first row of bricks in concrete, which must be durable and also very compact, whereby the bricks are always put in a staggered manner so as to meet the end with a wall up and with the weight of every single brick equally distributed between the parties Everything is important from the static point of view and also aesthetic, just think that the ancient Romans, they had realized the importance during their colossal buildings . Completed then the laying of concrete bricks, we just have to sand the surface, free it from leaking excess glue and possibly Staining  with the desired color, or smoothing it and leave it with the natural color, using only the flatting of transparent or simply ' straw oil. 


Thursday, August 22, 2013

How to plaster a brick wall

Many people have outside the house one or more walls made ​​of bricks that are sometimes unpleasant or maybe out of date.Even an interior wall , such as a fireplace or an interlude between two environments sometimes you want to change and intonation so that you can decorate with wallpaper, wooden beads or simply paint it. This may seem hard to realize however, is not at all but requires only some basic processing methods . Here is how plastering a brick wall .


First you have to prepare the surface of the bricks so they should be cleaned making them free of dust and dirt. The bricks damaged can be repaired with stucco and filled with concrete made ​​of cement and mortar . When the brick wall is compact after the restoration, then proceed wetting the wall with a sponge soaked in water. It 'important fact that the surface is sufficiently moist so that applying the plaster there is a good binding between it and the bricks.

Just with the grout starts the hedge of the brick wall. The stucco for walls, is generally available in powder or ready and must be applied in the spaces so as to avoid the grooves between a brick and another, which could create problems for the purposes of filling and excessive waste of mortar and concrete. After the filling of the spaces between the bricks, you start with a first coat of cement and sand (mostly) to create the insulating part that, once dried encourages the application of the plaster finish. After waiting and then drying the mixed sand and cement, we proceed with a first coat of plaster put roughly with the aid of a trowel and during the step of drying , it begins to straighten it with a pole in wood and with a damp cloth . In this way the bricks are covered with a layer of about one centimeter between concrete and plaster.

The brick wall, then becomes a normal wall masonry, is accomplished with the phases of processes typical in fact Proceed with sanding and finishing after that, once dried, the wall must be sanded and coated wall painting, with saved a cloth or paper. The plaster at this point is perfectly smooth and the bricks behind it will be only a distant memory compared to a completely transformed. 


Friday, August 16, 2013

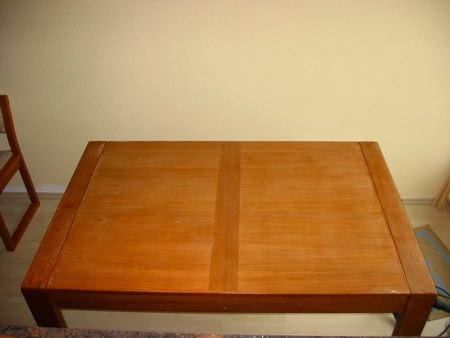
How to build a low table

An element really handy when you decorate a living room is definitely the coffee table comfortable when placed in front of sofas and armchairs .In the market you can find an endless array of models in every possible style, modern, classic,minimalist . Despite this immense variety , however, you may not be able to find what we seek, a model that meets our needs. At this point the only thing to do is definitely build with their own hands. In this guide we will see how to build a low table.


Before starting with page construction itself, will have to make some estimates of the type: a decor which combine such functions must be carried out, if in addition to a normal table we also want to be an element of decorum and finally how much is the figure that we are willing to spend for the creation of this item. Based on all these answers we might begin to outline a precise model.

If you do not have in mind anything definitive, so Terrance still in the dark, then you could take a ride on the internet and find out if one of the many ideas that are present, you can find something that suits you in terms of aesthetics.Just to help the undecided, we suggest some ideas to make with simple materials recovery then in addition to exclusive models also really very cheap. Let's start with an idea really nice, easy to implement. Obtain 5 wooden beams 14 x 14, the length 70 cm, 6 x 6 quadriplegia also the length of 70 centimeters. To retrieve this material you might go in a carpentry workshop, many times you can find scraps at affordable prices. Once home to prepare the equipment for the construction, sander, in the absence sandpaper in various grits, drill, wood screws , silicone transparent , clear coat , dark paint water-based.

With the sander or sandpaper, sand the boards so as to remove any splinters and make the surface as smooth as possible to do a good job, use the sandpaper of various sizes starting with the coarse, then medium and finally end. When the wood is well polished past a coat of varnish and let dry Once dry the paint repeat the process until the wood is not reach the tone you prefer Meanwhile prepared the logs that will serve as bases Always with the sandpaper polished wood, paint them with water-based paint in a dark color so that once mounted stand out from the color of the table, let it dry back to work on large beams, take the first, on the side past several rows of silicone, combined with the second and continue in this way until you get to the fifth Let dry for a few hours is now time to mount the quadrilateral  which will serve as bases, secure with wood screws of the measure 10 cm in order to get a grip, keep a distance of 3 cm apart Repeat with the other quadrille. The coffee table is ready to be flaunted in your living room .